Sourdough bread: Rye
Bread will never sound the same after this.
Disclaimer: it will take at least a week before you have your first bread. But it’ll be worth it and soon you’ll be bragging about the age of your sourdough starter. Note this will be the base starter for other breads as well, so you better choose a nice name, a good spot and lots of songs to sing to it.
Ingredients
for the starter
organic rye flour (it is extremely important to use organic flour for your starter, as you will not be successful without)
water
for the bread
200 gr bread flour (I generally add plain bread flour, because the rye starter is already quite heavy)
10 gr salt
80 gr water
Preparation
The sourdough starter
Plenty of people will tell you it’s easy to make a starter. And in a way it is, but it’s about a steady rhythm and keeping an eye on it. Here’s how it works: you only need flour and water. You start with an equal amount of flour and water (50 gr to 50 gr). Mix this well with a wooden spoon and set aside at room temperature until the same the next day.
The next day, reduce the starter to 50 gr and feed it again with a mix of 50 gr of water and 50 gr of flour.
Repeat this at least three more days (take away 50 gr from your starter and add a mixture of 50 gr of water and 50 gr of flour)
Now’s the time to start keeping a good eye on your start: it should be showing bubbles and increasing in size already. If your starter grows double overnight, it’s ready to start baking.
You can now store it in the fridge, but note it will need feeding about once a week, definitely when it’s young. When it’s older, every few weeks should work too.
As Pamela Anderson said about her sourdough starter named Astrid, when asked who was taking care of it while she was traveling: She’s fine, she’s in the fridge.
The bread (this will take about 48 hours)
Take your starter out of the fridge a couple of hours before mixing it.
In a bowl, mix 80 gr of water with 80 gr of organic rye flour. Take 80 gr of your starter. Put 80 gr of the mix with your starter and stir it with a wooden spoon. Your starter can now be put back in the fridge, awaiting your next bread.
Mix the 80 gr of your starter with the remaining 80 gr of the mix you just prepared with the spoon.
Set this aside at room temperature for about 24 hours, letting it double in size.
The day after, in a mixing bowl, add 200 gr of plain bread flour. Add the salt and mix quickly. Add the water and the new starter mix. Knead by hand, adding some flour if needed for 10’ or with a kitchen robot and the kneading hook for 5’.
You can now choose a quicker or overnight rise: put the dough in a bowl, covering it with a lid (allowing some air to access) or covered with a damp towel. Let it rise about 8 hours at room temperature or 24 hours in the fridge in the warmest spot of it. If you want, you can knead the bread once again shortly midway. This will make your bread look nicer for the gram, but the taste will be the same.
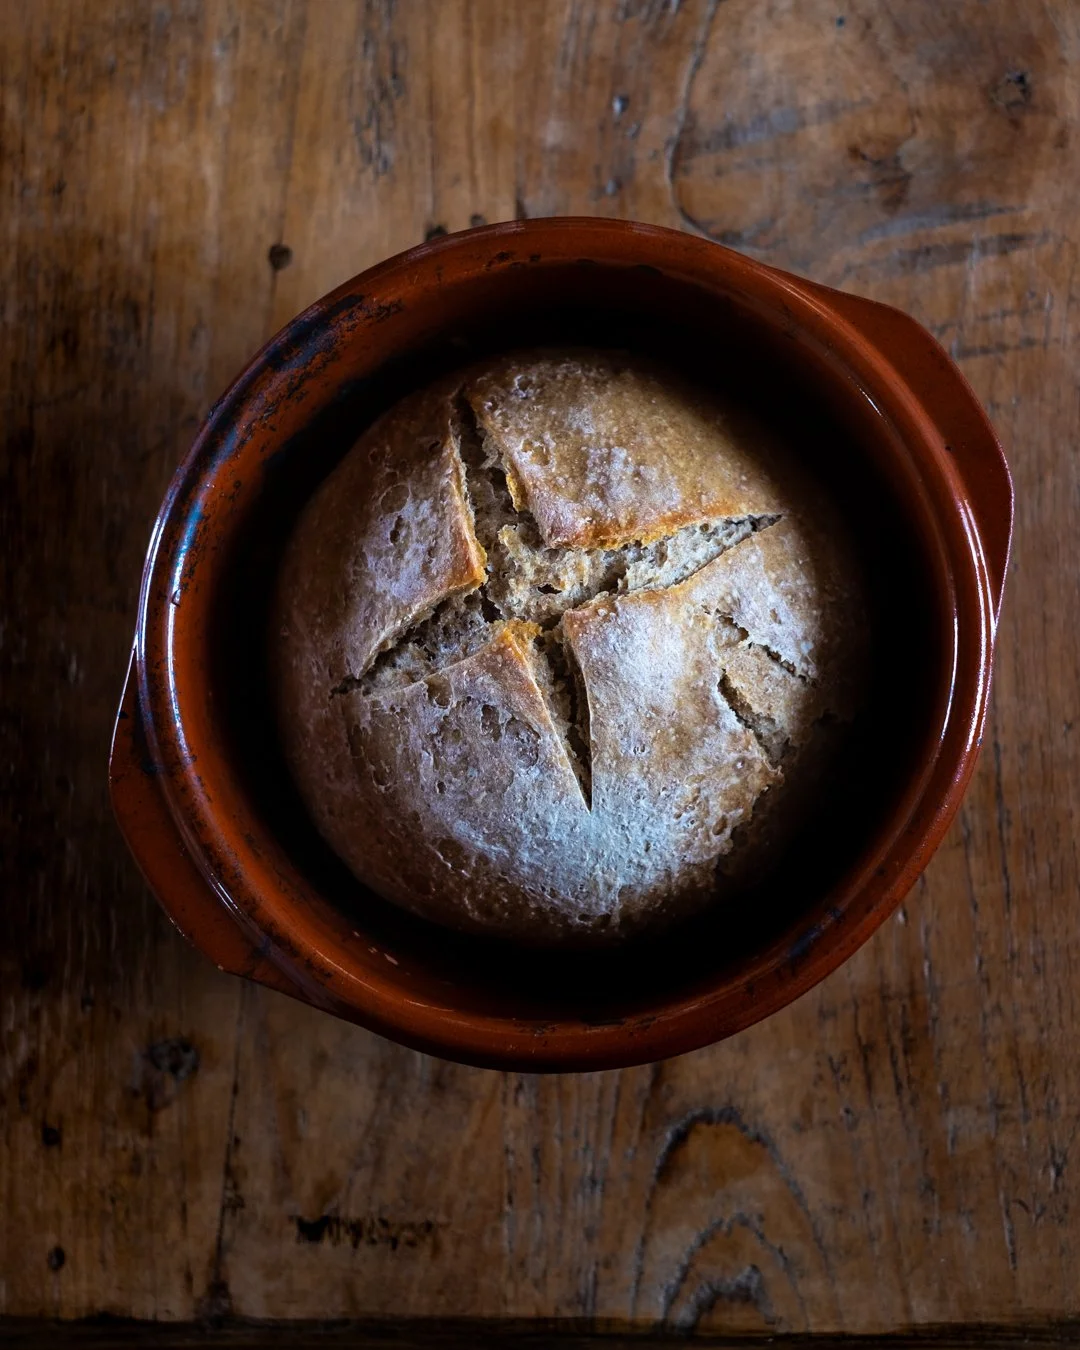
Prior to baking you can fold the bread as pleased, after a quick kneading. Cut a cross in the dough to let air escape.
There are several ways to bake this bread and all of them will need some assessment and trial with your oven:
Bake on a baking plate, lined with baking paper. Preheat your oven to 230-240C fan. When pre-heated put the bread in, and bake for 40-50’ keeping a good eye on it. It might take some time adjustments, depending on your oven.
My preferred way is to bake it in a dutch oven (basically a clay or metal heat resistant pot with a lid). Line the pot with baking paper and add your dough. Put the pot in the oven and heat the oven to 230-240C fan. Bake for 40 to 50 minutes when the oven is at the desired temperature. Take of the lid and bake for another 10’.
Let cool before cutting. You can easily freeze this bread and reheat after.
MORE BREADS, BUNS AND DOUGHS